Friday, May 31, 2013

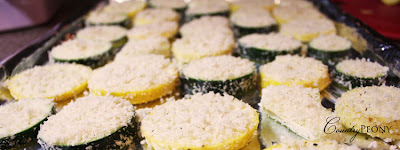
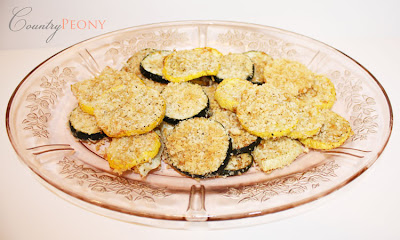
Summer Squash Parmesan Crisps

Thank you for visiting. I now have a new home at www.countrypeony.com. I hope you will find me there.

As soon as the temperatures rise, and the smell of fresh cut of grass is in the air, I am reminded of enjoying fresh, savory vegetables from my parent's wonderful garden. Fresh squash is synonymous with summertime to me.

I recently picked up some wonderful goodies from my husband's grandparents. So, I thought I would put those goodies to use and share this savory and sweet recipe from Food Network that conjures up summertime memories. This recipe is ideal for many situations. It is great as a snack, appetizer for a dinner party, or as a side item. It is also delightful warm or cold. If the sweet smells of fresh and baked parmesan don't get you, then the sweet, yet savory taste of the squash will. So be prepared to enjoy the smells and tastes of this very simple delight.

Summer Squash Parmesan Crisps


Squash Baked Parmesan Crisps

Zucchini and Squash 

Summer Squash and Olive Oil
Olive Oil and Summer Squash mixture.

Fresh Mozzarella

Squash with Panko and Parmesan
Panko, Fresh Parmesan, Salt, and Pepper mixture.

I added aluminum foil to the baking sheet to help with clean up.

Summer Squash Panko Parmesan Crisps

After I took the warm squash out of the oven, I placed them on a cooling rack so that they maintained their consistency and cooled down properly.

Baked Summer Squash Crisps

Baked Zucchini Parmesan Crisps

I hope you have a wonderful weekend. And I hope you get some time to enjoy the summer wherever you may be. 


Wednesday, May 29, 2013

DIY Faux Mercury Glass

Thank you for visiting. I now have a new home at www.countrypeony.com. I hope you will find me there.

DIY Faux Mercury Glass


I think mercury glass instantly makes a space feel more elegent and romantic. It was a wonderful accessory for our winter wedding. We borrowed the majority of our mercury glass pieces due to its high price tag.

Therefore, today I am going to show you a very easy way to avoid the high price tag, and make your own mercury glass pieces out of recycled jars. I followed Todays Creative Blog post featured on Tidy Mom highlighting the simplicity of this project.

I have been saving some glass juice jars with beautiful details at the top for an upcycle project. I thought applying the mercury glass technique would be the best way to bring out the detailing on the top of the jars. I am so glad that I did!  

But first, I would love to show you an interesting way that I removed the glued label from my juice jar. This site had some wonderful options. I decided to try the peanut butter option, because I honestly thought it sounded neat and I had some peanut butter on hand. I added a sterling silver scrubber into the mix to ensure all of the glue was off. To my surprise the peanut butter worked very well!

Remove label from jar

Cleaning the glue off of your jar

Now for the fun part. For your faux mercury glass effect, you will need: equal parts apple cider vinegar to water (I used 3 tablespoons of each for my two juice jars), spray bottle, cotton towel, jar, and Krylon Looking Glass Mirror-Like paint. While researching this project, I was made aware that the spray paint would be hard to find. I did not find it at Michael's, but I did find it at Wal Mart. There are also numerous sites online that have it in stock. This paint is crucial to the process, so I would suggest investing in some. It also creates a wonderful effect on its own. 

DIY Faux Mercury Glass

One thing to remember while creating this project is to not take yourself and your artistic abilities too seriously. Take a cue from real mercury glass and its imperfections, and have fun with it.

I would highly recommend taking this project outside, and wearing gloves as you spray paint the jar. The spray paint recommends painting the inside of the jar. I chose to paint the outside because my jar opening was not large enough, and I wanted to be able to place fresh flowers in it afterward. 

Krylon Looking Glass Paint

Mercury Glass tutorial

DIY Mercury Glass


My favorite part of this project was the dabbing process. I was very abstract with my technique, and the transformation took only seconds. It was a lot of fun!

Easy DIY Mercury Glass

DIY Mercury Glass

This project is wonderful, because it does take less than 30 minutes to complete all steps. I love to watch the transformation process take effect. Have you ever experimented with mercury glass techniques? What process did you use? 

Friday, May 24, 2013

Homemade Bubble Bath

Thank you for visiting. I now have a new home at www.countrypeony.com. I hope you will find me there.

Homemade Bubble Bath


Who doesn't love a relaxing bath? Today, I've got a way to enhance a relaxing bath with a homemade bubble bath recipe.

Honey and vanilla steal the show in this recipe. Honey is a wonderful healer and moisturizer. In addition, the scent of vanilla is known to help reduce stress and anxiety. The perfect combination for a soothing bubble bath experience.

For this recipe from Real Simple, you will need: 1 cup of almond oil (or any light oil like canola or sunflower), 1/2 cup of honey, 1/2 cup of mild unscented hand or body soap, 1 tablespoon of vanilla extract, and a container with a lid (I used a glass container, but I would recommend plastic so you don't run the risk of breaking the container near your bathtub).

Tools for Homemade Bubble Bath

Vanilla Honey Bubble Bath

After you combine all of the ingredients in your container, shake well and pour into your bath water. Then simply enjoy!


Homemade Bubble Bath

I hope you get a chance to enjoy some relaxation this weekend. How do you find time to relax? 

Sunday, May 19, 2013

DIY Polka Dot Shirt

Thank you for visiting. I now have a new home at www.countrypeony.com. I hope you will find me there.

I love Kate Spade's flawless mix of bold sophistication with playfulness. The first edition of the Style Soiree! - Link Party Summer Series inspired me to create a Kate Spade influenced blouse. Today I am linking up at Our Fifth House, Pinterest Told Me To, Rain on a Tin Roof, Southern State of Mind, and Effortless Style to showcase my very simple DIY gold polka dot shirt.

DIY Polka Dot Shirt

For this DIY project you will need: cotton shirt, gold fabric paint, paintbrush, cardboard that can fit inside of the shirt, disappearing ink marking pen, and a round template for the polka dots (I used a tealight candle).

Tools for Polka Dot Shirt

Start off by deciding on the pattern that you want to create. I kept with a very simple pattern since the gold and coral colors were bold to begin with. You can have some fun with your pattern. Maybe more dots at the top, and less at the bottom or vice versa. Whatever you choose, run with it!

DIY Polka Dot Shirt

I used tea light candles to draw out my polka dots. The great part about the disappearing ink is that if you mess up on one of your dot patterns you can start over in a different spot.

The fabric does move so make sure that you stretch it out with your fingers as you draw around your template.

DIY Polka Dot Shirt

Once your pattern is drawn, and you are ready to paint, place a piece of cardboard inside of the shirt. This will disable the paint from seeping into the back layer of the shirt, and keeping the two layers from sticking together.


Homemade Polka Dot Shirt


Also, start painting from left to right if you are right-handed, or paint from right to left if you are left-handed. I also recommend that you start at the top of the shirt and work your way down.


Painted Polka Dot Shirt

Like you did when you were tracing your template, you can also use your fingers to spread the fabric out when you paint so that you get a nice, clean line.

Gold Polka Dot

And, voilà! Now you have gold polka dots, and your lines have disappeared. Wait atleast 48 hours before you wash your shirt to ensure the paint is completely dry and settled. 

Homemade Polka Dot Shirt

Gold Polka Dot Shirt

DIY Gold Polka Dot Shirt

I am excited to wear this shirt into the summer months.

Do you have any tricks for painting with fabric?

Friday, May 17, 2013

Juicing Made Easy

Thank you for visiting. I now have a new home at www.countrypeony.com. I hope you will find me there.

healthy juice

When we received our juicer as a wedding present, I had grand ideas to juice on a regular basis. That dream soon turned sour, because I became a bit overwhelmed with all of the possible ingredient combinations. After some trial and error, I found some key juice recipes that bring my grand idea to fruition.

Today, I would like to share a very simple, yet healthy juice recipe that requires only three ingredients. I especially love this recipe, because the ingredients don't require a lot of prep work.


homemade juice

The fresher the ingredients, the better. This recipe will make 3 servings. I used 3 Granny Smith Apples (you can take 1 apple away if you prefer less calories and less sweetness), 4 carrots, and 3 stalks of celery. 

fresh vegetables

I scrubbed the vegetables and apples clean. Then I cut off the leaves from the vegetables, and cored the apples. For added nutrition, and to save on prep time, I left the skins on the apples. I ran the ingredients through the juicer, and in no time I had a delicious, healthy drink. 

Jack LaLane

Jack LaLane Juicer

The sweet, refreshing, and creamy texture of this drink make it my go-to afternoon drink, or a light meal replacement on busy work days. 

DIY Juice

Are you an avid juicer? What is your favorite juicing recipe?

Wednesday, May 15, 2013

What I'm Lovin'

Thank you for visiting. I now have a new home at www.countrypeony.com. I hope you will find me there.

I do apologize for my delayed posts this week. Event coordinating has been keeping me very busy. I hope your week is going well.


1. Benefit's Fake Up Concealer: I mentioned in a previous edition of What I'm Lovin' that  I don't like to spend a lot of money on makeup. Well, I feel like I am contradicting myself once more, because this product is not cheap. However, Benefit has wonderful products, and this one does not dissapoint. Given my sometimes long work hours, I don't have a lot of time to touch up my makeup. Fake Up concealer is perfect for getting rid of the under-eye shadow, and for minor touch ups throughout the day. I also really like this product, because the moisturizer surrounding the concealer creates a nice, soft finish.

2. Hometalk: Hometalk is known as "the largest home & garden knowledge hub on the web. It's fueled by the firsthand experience & advice of hundreds of thousands of home enthusiasts and professionals." Their description is hard to beat, because that is exactly what Hometalk is about. It is a wonderful resource of inspiration. You can also post projects and questions for feedback.

3. Sally Hansen's Airbrush Legs: Summer is around the corner, and sun is in abundance here in Texas. However, I am trying to proctect my skin from the daily rays. A dear friend of mine recommended Sally Hansen's Airbrush Legs to add a little color to my light skin. The product dries instantly, and it creates a natural, flawless finish. I have worn it on several occassions, and it does not rub off throughout the day. It is a perfect accessory for a summer picnic, wedding, or any occassion where your legs are on display.

4. Style Me Pretty Living: I have spent many hours perusing the beautiful pages of Style Me Pretty. I was thrilled when I heard that Style Me Pretty now has a separate lifestyle site called: Style Me Pretty Living. It is what you would expect from the wonderful editors of Style Me Pretty. The stories and pictures are flawless, and they ooze with prettiness :).

I hope you have enjoyed this edition of What I'm Lovin'. What are you loving this week? Are you familiar with any of the products above? If so, what do you think of them?

*I was not compensated for this post. The paragraphs above reflect my personal opinion.

Sunday, May 12, 2013

Happy Mother's Day

Thank you for visiting. I now have a new home at www.countrypeony.com. I hope you will find me there.

Happy Mother's Day to all of the beautiful mothers and motherly figures out there. May your day be filled with love and gratitude.

Friday, May 10, 2013

Homemade Pickles

Thank you for visiting. I now have a new home at www.countrypeony.com. I hope you will find me there.

Homemade Pickles

I feel very lucky to have such wonderful parents that I can share lasting memories with, while also learning new things along the way. In honor of Mother's Day, I would like to share a special post featuring my mother.

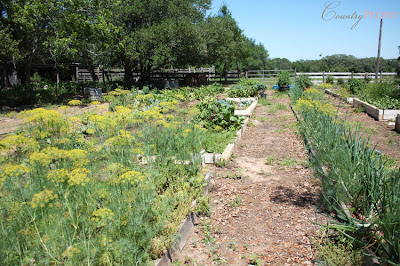
My mother has been picking cucumbers from my dad's lovely garden for years, and magically turning them into delectable pickles. On a recent visit home my mother showed me how she turned those cucumbers into homemade sour dill pickles. 

Country Garden

For this recipe of sour dill pickles you will need: pickling cucumbers (small cucumbers), pickling rack, large pot, funnel, jar lifter, canning salt, canning vinegar, garlic, onion, dill (preferably fresh), jar, ring and unused lid. 

how to make pickles

The first step is to add water to your large pot, and bring it to a boil.

As the water is heating up, you need to thoroughly wash and scrub your cucumbers. Dirt can easily settle into the cucumber's ridges. Then you need to cut the ends off the cucumbers. This helps the flavoring to absorb more thoroughly into the cucumber. If some of your cucumbers are too large, I would recommend cutting them into quarters or spears.

Next, you can cut your onions into small cubes. Then remove the skins from the garlic cloves, and set your ingredients aside.

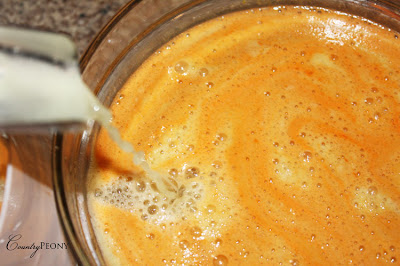
In a small pot make your pickling brine. We used 4 cups of water, 2 cups of canning vinegar, and a 1/2 cup of canning salt. Stir the mixture occasionally until the salt dissolves. (If you have some pickling brine left over, you can store it at room temperature in a leftover jar for later use.)

Once you have prepared all of your ingredients, you need to prep your jars. (My mother recommends investing in a brand-name jar, like Mason, Bal,l or Kerr, because the quality of the jar is crucial to the process of pickling.) You need to ensure that your jars are sterilized. One quick way to strerilize your jars is to load them into the dishwasher, and place the cycle on high heat. You also need to gather your lids. You can re-use screw tops as long as they aren't already rusted from all of the salt that they come in contact with from canning. However, you have to use a new flat cap.
  
turning cucumbers into pickles

Next, take your jar and place it on its side. Start to stack the cucumbers inside the jar. It is kind of like a game of tetris, because you have to pick the correct cucumbers to match the correct spaces. My mother recommends that you pack the cucumbers very tightly, because if you don't the cucumbers will float. The cucumbers also shrink during the pickling process. The packing process can be tedious and hard on your fingers. So I would recommend having a pickling party to make the process more fun :).

DIY Dill Pickles

Once you have packed all of your cucumbers, then you add the garlic, onions, and dill.

Dill Pickles

Next you take your pickling brine, and pour it over the fresh ingredients using a funnel.  

Homemade Pickles 

Then wipe the jar top clean and dry, so that a nice seal is formed during the process.


Dill Pickles

Attach the lid cap to the dry jar top. Add the lid ring while you hold the lid cap down. Tighten extremely well.


Homemade Pickles

Use the jar lifter to slowly lower the jar into the pot of boiling water. This is the most crucial step. You need to ensure that you slowly lower the jar about an inch every 15 seconds so that you can temper the glass. If you don't lower slowly, then you will break the glass jar, and you will have to start over.

Watch and wait as the cucumbers turn into pickles.  

Making Pickles

Keep the pickles submerged until they start to turn colors. You have to trust your instinct on this one. If you leave the pickles in for too long they will become soggy.

Sour Pickles

After you take your pickles out, leave the jar in a safe place until it cools down. Once it cools down, it will create a vacuum and the lid will become concave. Then wait for 2 months until you can finally enjoy your hard work. 


I learned that with the right patience and love, you can create a delightful treat to be enjoyed by all. Thanks mom.

Have you ever made pickles, or pickled? If so, what is your favorite thing to pickle?

Related Posts Plugin for WordPress, Blogger...