Wednesday, January 25, 2017

Swan Lake First Birthday Party

Thank you for visiting. I now have a new home at www.countrypeony.com. I hope you will find me there.

We celebrated my baby girl's first birthday last weekend. To say I had fun planning and executing my daughter's ballerina/Swan Lake birthday party would be an understatement. I loved it! It was such a fun theme for a little girl who loves to dance. For the playful theme I used different shades of pink with white and gold accents. I made the majority of the decorations and used items from her bedroom to add special touches and save on cost. 

I hope you enjoy the pictures below as they highlight some of the details from her first birthday. 


The venue has a beautiful lake in front of it, so I thought it would be fun to add a 6 foot swan to the lake to greet guests as they walked up. Six foot swan, why not?


My wonderful mother whipped together the above tutu garland with some tulle to greet guests as they entered the party. 


I created a fan and tutu backdrop behind the food table to add a focal point that wasn't in the way of the food. Chelsea with Two Twenty One has a great tutorial for a fan wall. 

I will feature the tutu balls in a tutorial on the blog soon. 


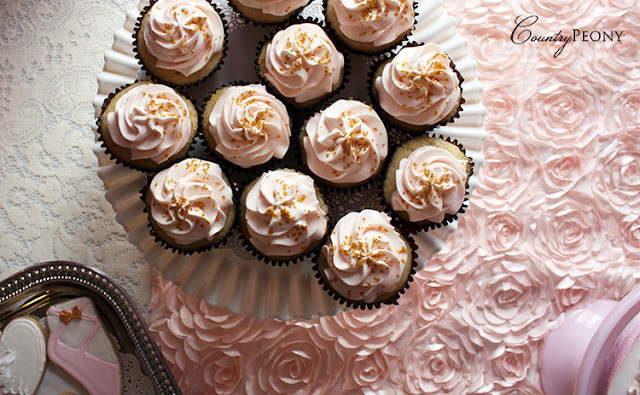
Aside from the good company, my favorite part of the celebration was the desserts. Rebecka with Sweet Alyse Bakery did an incredible job with the smash cake, cookies, and cupcakes. I gave her minimal direction, and she delivered a stellar product. Not only were they perfect for the theme, but they were scrumptious. You can see more of the desserts in detail below. 


A first birthday isn't complete without a monthly picture wall garland. I love watching my baby grow. I kept my son's garland up in our house for over a year. 


To add extra interest, I pulled items from my daughter's bedroom that worked with the theme like her curtains and tutus.


As an event planner this party was so fun to create, because I knew my daughter would enjoy it regardless of how everything turned out. In the end it turned out to be a wonderful celebration with our friends and family. Thank you to everyone who celebrated with us. 

Confetti Balloons: Yugucu
Number 1 Balloon: Magnolia Bloom Btq
Ballerina Garland: Meri Meri Party Garlands
Paper Fans: Hobby Lobby
Large Inflatable Swan: Wal Mart
Linens: Borrowed from my mother-in-law
Serving Trays: Borrowed from my mother-in-law and mother

Wednesday, January 18, 2017

Heart Healthy Valentine Treats

 Thank you for visiting. I now have a new home at www.countrypeony.com. I hope you will find me there.

Valentine's Day is less than a month away. I love giving away homemade gifts for this holiday to friends and family. I am trying to make healthier choices and I thought these heart healthy chocolates would be the perfect treat for my friends and myself. 

*I want to start off by saying that I am not a nutritionist, doctor, nor health practitioner. When I say "heart healthy" I am referring to the dark chocolate (as a treat) as a better alternative to some other treats on the market. I also think the term heart healthy is appropriate, because (as cheesy as it sounds) these treats are so cute and so fun to give that they warm my heart. 

My beautiful friend, Lauren, started me on the chocolate bark with nuts (which I will feature later) about a year ago. Thank you Lauren. I took her recipe and added a cute twist with the heart molds for the Valentine's season. 


For this project, you will need:


The first step is to break off the chocolate bark into pieces and place the pieces into the microwave safe bowl. Then microwave the chocolate in the bowl for 30 seconds. 


Take the bowl out and stir the chocolate with the spoon. Place the chocolate back in the microwave for 30 more seconds. Take the bowl out and stir the chocolate with the spoon. Repeat this process until your chocolate is almost melted (some chocolate chunks should still be present). Each microwave setting is different, but my microwave took me four times at 30 seconds to melt the chocolate to the consistency I liked. It is important not to do more than 30 seconds at a time, because you don't want to burn the chocolate. Steady and slow is key to creating the right consistency. 


Spoon the melted chocolate into the heart-shaped molds. Keep some space at the top for the nuts and dried fruit. This process is messy. These molds are dishwasher safe so don't worry about making a mess. 


Roughly chop the dried fruit and mixed nuts. Then sprinkle the nut and fruit mixture onto the melted chocolate heart-shaped molds. Ensure that every nut and fruit piece is sticking to the chocolate so they freeze with the chocolate. 


After this step, place the baking pan directly into the freezer. Wait 2-3 hours, and your chocolate treats should be frozen. Once frozen the chocolate treats will pop right out of the silicone baking molds. 


Once you pop them out don't over handle them, because the heat from your hand may cause them to melt. Package and label them. Then store them in the freezer before you gift them, or before you enjoy them. I hope you enjoy making these "heart healthy" treats. 


Monday, January 16, 2017

DIY Growth Chart

Thank you for visiting. I now have a new home at www.countrypeony.com. I hope you will find me there.

I grew up in the same farmhouse that my parents still live in. Its beautiful old walls have many dings and marks from wear and love over the years. The marks I remember the best are behind a dresser in my parent's closet. Every year my four siblings and I would stand next to that wall behind the dresser and my mother would make a mark on the wall to indicate our height and age. It was so fun to compare growth ticks with each sibling and ourselves each year. I wanted the same for my children, but I knew we wouldn't be in our forever home for a while. So, with my husband's help we created a DIY growth chart that we can take with us to keep forever.

For this project we followed April Wilkerson's very helpful DIY Wood Burned Growth Chart Ruler video via her youtube channel.


For this project you will need:
  • Square Edge
  • Painter's or Masking Tape
  • Tape Measure
  • Clamp
  • Woodburner (we used the 1/4" flathead)
  • Wood Pencil
  • Numeric Stencils
  • 1X12 - 6 ft long wooden board. We used pine. Look for a board that is straight, without cracks, and doesn't have knots where you will place the numbers. The drier the wood the better for application. 
  • Fan 
  • Mounting Hardware
  • Finishing Products
    • Stain (we used Minwax Wood Finish stain in Dark Walnut)
    • Brush or rag to apply the stain. We used a foam brush, because we wanted a nice even application without brush marks. 
    • Polyurethane
    • Fine grit sandpaper


Clamp the tape measure to the end of the board. We started the board at 6 inches, because we assumed we would hang the board 6 inches above the ground due to baseboards. If you plan to place your board directly onto the ground clamp the tape measure at the beginning of the board starting at 0 inches.


Mark out every inch. Then mark out an 1/8" on either side of the inch mark to account for the width of each inch tick mark. Leaving each tick mark to be 1/4" thick. 

After you make your tick marks, take your square edge and make a line to represent the different dimensions. For reference:
  • Each tick mark representing a foot is 3" long
  • Each tick mark representing 1/2 foot is 2" long
  • Each tick mark representing 1/4 or 3/4 foot is 1 1/2" long
  • All other tick marks are 1" long
Then connect the two lines to block off the tick marks. 


Now take your stencils and center them on the tick marks representing each foot. Tape the stencil down with painter's or masking tape. Ensure that you stay consistent and aligned with how far your numbers are away from the tick marks. 


Once you have stenciled out the numbers it is time to start the wood burning process. Use the wood burner to blacken all of the tick marks and numbers. 

*Tip: we found it helpful to outline the tick marks and numbers first and then filled in to create a crisp and even line. This ensured that we didn't burn past the lines. 


Some wood, including pine, contains sap. As you burn, the sap may seep out and you will have to clean off your wood burning tip. Use a piece of scrap wood to clean the charred sap off the tip. 

It is important that you burn the wood in a well ventilated room. We also used a floor fan and overhead fan to ensure the smoke circulated.

The wood burning process takes a long time. It is important to be patient if you want a quality finished product. My husband (the more patient between the two of us) completed this project, and I couldn't be happier with it. 

From here you can decide to stain and polyurethane your growth chart to help protect it. We used Minwax Wood Finish Walnut Stain since we wanted a darker finish. Follow the recommended directions on the staining product you use. We applied one coat of stain and three coats of polyurethane. We used 120 fine grit sandpaper in between each coat of polyurethane to ensure a smooth finish. 

Apply mounting hardware and enjoy watching your little ones grow. 


Related Posts Plugin for WordPress, Blogger...