Showing posts with label in the kitchen. Show all posts

Monday, April 3, 2017

Avocado Veggie Dip

Thank you for visiting. I now have a new home at www.countrypeony.com. I hope you will find me there.


With two little ones to run after all day I don't get much time to sit down to a formal meal. That said, my snacking game is very important and I don't always choose the best options. While experimenting in the kitchen one afternoon I created a VERY simple vegetable dip that has since elevated my snacking game. Creating this veggie dip has now become part of my Sunday night routine as I chop my vegetables and fruits for the week. 


For this simple recipe, you will need:
  • Juice of 2 small limes, or 1 large lime 
  • 1 large Hass avocado. Save the pit to help extend the life of the avocado. 
  • 1/3 cup of greek yogurt
  • 2 Tbsp of olive oil


Place all ingredients in your favorite food processor or blender. 


Blend all ingredients until they are incorporated together. And that is it! Didn't I say it was easy?


Depending on the ripeness of the avocado you may need to add more lime, olive oil, or greek yogurt. Your preference, but I like to finish with a pinch of pink salt and cracked pepper. 


I store the dip in an air-tight container in my refrigerator for up to 3 days with the avocado pit. I love this recipe, because it adds variety to my vegetables and the protein helps keep me full longer. 

I enjoy pairing this dip with red bell peppers (the sweetness and crispness are a nice contrast), and cucumbers. As you can see from my instagram feed, thecountrypeony, my one-year-old daughter also loves this dip. Now if only I could get my three-year-old son on board. 

I hope you find that this dip helps to elevate your snacking game. 

Wednesday, March 29, 2017

Homemade Playdough

Thank you for visiting. I now have a new home at www.countrypeony.com. I hope you will find me there.

If you follow me on Instagram, @thecountrypeony, you may have noticed that my three-year-old son and I love playing in the kitchen. He is at the age where he wants to try everything, and I try to encourage his enthusiasm for learning. Since my son loves playdough I thought it would be fun for him to help me make his own version. DIY Natural has a simple and easy-to-follow playdough recipe that we used.

My son and I had a great time making this playdough, but this is a very messy process (especially with an excited three-year-old). Therefore, I recommend a dose of patience added to the ingredients list.


Ingredients & Tools:
  • 1 cup of flour. Plus a handful of flour to help roll out your playdough onto the countertop. 
  • 1/4 cup of salt. I only used sea salt, because that is what I had on hand. 
  • 1/2 cup of water
  • 5 drops of food coloring
  • 2 mixing bowls
  • Spoon for mixing

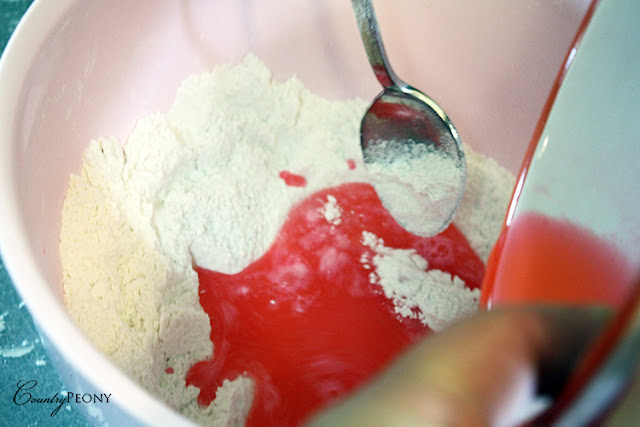
In one bowl mix together the flour and salt. In another bowl mix together the food coloring and water.


Then slowly add the food coloring/water bowl into the flour/salt bowl, stirring while you pour. 


Once all ingredients are stirred together, knead the dough until the flour is absorbed into the wet mixture. 


Then place some flour onto the countertop and continue to knead the playdough until you get the consistency that you like. Add more flour if it is too sticky, and more water if it is too dry. 


Finally it is time to enjoy the fruits of your labor, or hopefully a moment of quiet time as your child plays. 


I stored his playdough in a ziploc bag at room temperature. It lasted about a month until I thought it was time to start over. 

Whether or not your child is able to help with this project, I hope he or she enjoys the end product. 

Wednesday, January 18, 2017

Heart Healthy Valentine Treats

 Thank you for visiting. I now have a new home at www.countrypeony.com. I hope you will find me there.

Valentine's Day is less than a month away. I love giving away homemade gifts for this holiday to friends and family. I am trying to make healthier choices and I thought these heart healthy chocolates would be the perfect treat for my friends and myself. 

*I want to start off by saying that I am not a nutritionist, doctor, nor health practitioner. When I say "heart healthy" I am referring to the dark chocolate (as a treat) as a better alternative to some other treats on the market. I also think the term heart healthy is appropriate, because (as cheesy as it sounds) these treats are so cute and so fun to give that they warm my heart. 

My beautiful friend, Lauren, started me on the chocolate bark with nuts (which I will feature later) about a year ago. Thank you Lauren. I took her recipe and added a cute twist with the heart molds for the Valentine's season. 


For this project, you will need:


The first step is to break off the chocolate bark into pieces and place the pieces into the microwave safe bowl. Then microwave the chocolate in the bowl for 30 seconds. 


Take the bowl out and stir the chocolate with the spoon. Place the chocolate back in the microwave for 30 more seconds. Take the bowl out and stir the chocolate with the spoon. Repeat this process until your chocolate is almost melted (some chocolate chunks should still be present). Each microwave setting is different, but my microwave took me four times at 30 seconds to melt the chocolate to the consistency I liked. It is important not to do more than 30 seconds at a time, because you don't want to burn the chocolate. Steady and slow is key to creating the right consistency. 


Spoon the melted chocolate into the heart-shaped molds. Keep some space at the top for the nuts and dried fruit. This process is messy. These molds are dishwasher safe so don't worry about making a mess. 


Roughly chop the dried fruit and mixed nuts. Then sprinkle the nut and fruit mixture onto the melted chocolate heart-shaped molds. Ensure that every nut and fruit piece is sticking to the chocolate so they freeze with the chocolate. 


After this step, place the baking pan directly into the freezer. Wait 2-3 hours, and your chocolate treats should be frozen. Once frozen the chocolate treats will pop right out of the silicone baking molds. 


Once you pop them out don't over handle them, because the heat from your hand may cause them to melt. Package and label them. Then store them in the freezer before you gift them, or before you enjoy them. I hope you enjoy making these "heart healthy" treats. 


Wednesday, December 21, 2016

Homemade Gingerbread Christmas Tree Ornaments

Thank you for visiting. I now have a new home at www.countrypeony.com. I hope you will find me there.

Since we are home for the holidays, my son wanted to help my mother "Oma" make gingerbread Christmas tree ornaments in her kitchen. He is "Mr. Big Helper" these days, and I am loving his enthusiasm for all things Christmas. We followed Nick Malgieri's gingerbread recipe via Kitchn and Martha's Stewart's Royal Icing recipe via Kitchn's "How to Make Gingerbread Christmas Tree Ornaments" post.

We followed each recipe to the t, and the final product was a beautiful and aromatic cookie that we enjoyed decorating. 


Baking with Oma

Baking with Oma


*Baking Tip: It is important to keep your dough cold so that the butter doesn't melt and ruin the consistency of the cookie while it bakes. 


To make the holes for the tree, take 1 toothpick and break it twice. Then place the toothpick about 1 inch from the top ensuring you made a hole all the way through. Keep the toothpick in place while the cookie bakes so your hole doesn't close shut. 


*Baking Tip: Once you remove the cookies from the oven, slide the parchment paper on to the countertop or cooling rack to stop the baking process. Also, take the toothpicks out so they don't get stuck as the cookies cool. 

As I mentioned before we used Martha Stewart's recipe for Royal Icing. In lieu of a piping bag, you can use a zip up plastic bag like below. Spoon the icing into the bag and twist one end of the plastic bag. Then cut a small piece off of one of the bottom corners. 


From here you can choose to decorate with the Royal Icing and by adding special embellishments like edible sprinkles, candy, etc. 

I know my limits and I am not an expert decorator. So, when I saw these beautiful Vintage Santa wafer papers from Fancy Flours I was hooked. I knew these images would add a sense of elegance and whimsy to my tree. As a nod to the quilters in my family, I also purchased these red and white cross stitch squares.

Fancy Flours includes a set of instructions that were also very easy to follow. 


I hope you get to enjoy some time with your family doing things that you love this Christmas season. 

Wednesday, December 14, 2016

Christmas Wassail

Thank you for visiting. I now have a new home at www.countrypeony.com. I hope you will find me there.


Christmas can be a busy and stressful time for many. However, once all of the holiday hustle is somewhat managed in my life I try to embrace Christmas as a time to reflect and enjoy the beautiful things in my life. 

Drinking Wassail gives me that same reflective feeling. Wassail evokes memories of being with my family and enjoying each other's company. This ancient drink has beautiful roots that ultimately means to be "full of health." Recently my days, like many others, have been busy, and I wanted to take some time to slow down and I thought this drink would do the trick. I wanted to make a modern version, and I loved what Jen did with her simple Wassail recipe. I added a little more spice to my concoction and as you can see below this recipe was very simple, yet it gave me the same nostalgic feeling I was after. This recipe not only tasted fantastic, but it made my house smell like Christmas.


For Christmas Wassail, you will need:
  • 8 Cups of Apple Cider
  • 2 Cups of Orange Juice
  • 1/2 Cup of Lemon Juice (Juice of 3 Large Lemons)
  • 5 Whole Cinnamon Sticks
  • 15 Whole Cloves
  • 1/4 Teaspoon of Ground Ginger
  • 1/4 Teaspoon of Ground Nutmeg


*Simple Tip: If you are squeezing the lemons place your hand under the lemon flesh so that you catch any seeds before they enter your juice. 


Combine all of your ingredients into a large pot. Bring to a boil, then simmer on low heat for about an hour. 

As Jen mentions, you can certainly half this recipe if it is too large for you. I placed my leftovers in a pitcher and enjoyed a mug the next day. 

I hope this Wassail allows you some time to relax this holiday, and that it brings you good health this season. 


You can find my Magnolia Market Campfire Mug here

Monday, September 23, 2013

Strawberry Scones

Thank you for visiting. I now have a new home at www.countrypeony.com. I hope you will find me there.

strawberry buttermilk scone

As a nod to the start of fall and colder weather, I made scones this weekend. I recently enjoyed scones on a summer trip to Colorado, and first encountered fresh English scones when I visited the UK a couple of years ago. Even though, our part of the country is still experiencing warm weather, this recipe lovingly reminded me of colder climates in hopes that fall's cold weather will visit us soon.

One of my favorite bloggers, Cupcakes and Cashmere, inspired me to follow this recipe from Tartine via Breadtastic. You won't be disappointed as the smells of strawberries and butter indulge your senses while you wait for these goodies to bake. The final product is a sweet yet tart, substantial breakfast/brunch option perfect for your China and fancy napkins. Hope you enjoy!

Fresh Strawberries

cut strawberries

Butter

strawberry scone

strawberry buttermilk scone
Related Posts Plugin for WordPress, Blogger...