Thank you for visiting. I now have a new home at www.countrypeony.com. I hope you will find me there.
Like life, it is important for me not to TRY to take my craft projects too seriously. I always have an idea in my head what my future projects will look like, and most of the time the idea doesn't come to fruition. And, I am trying to be okay with that :). The process of creating something is almost as important to me as the finished product, and if I am not having a good time with it, than I feel I am wasting my time. That is why when I get discouraged with a project I am working on, I walk away from it. After a few hours, days, or weeks I re-visit it with a different approach. So if you tend to be a perfectionist, than this approach may help you.
I felt the above paragraph was a good introduction to this blog post, because that is exactly how this project started for me. Martha Stewart featured this beautiful coffee filter wreath as one of her holiday projects last year. I watched the video, and thought it was pure genius, and that it would be so easy to make. Well my intentions were good, but my abilities weren't. It was not turning out the way that I wanted it to (as you can see in the picture below). So, I became discouraged, and it sat on my craft table for over a week. I continued with other projects, and kept it in the back of my mind and peripheral view.
I was recently doing some research on wreaths, when I spotted this beauty by Design, Dining, and Diapers. Not only was her final product beautiful, but her approach sounded like fun.
So I used Taryn's wreath as an inspiration. Instead of staining the coffee filters with tea (which is a brilliant idea by the way), I used unbleached coffee filters. I knew they would add the fullness I wanted, and the color was there without the extra prep work.
I tore off the coffee filters I had previously adhered to the Martha Stewart wreath, and got to work. Taryn's screwdriver method worked very well, and it was a great arm workout. I also wanted my wreath to be very full, so I placed my coffee filters about an inch from each other. As Taryn recommended I added extra jabs to each filter, which gave my wreath varying layers and heights. The extra jabs also better secured the coffee filters into place. I continued the method around the entire wreath until it was completely covered.
In its entirety, this project took me about two hours, and I used one bag of 200 coffee filters. One thing I will mention ahead of time is that the hay from the wreath is very messy, so be prepared to clean up afterward.
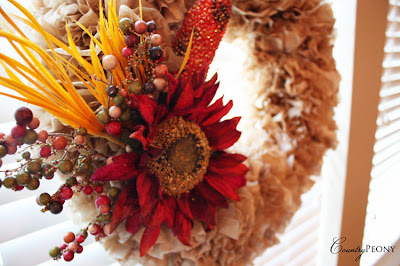
After I added the coffee filters to the base, I wanted to add some fall inspiration. So I picked up some cute knick-knacks from Hobby Lobby and adhered them to the wreath with wire and hot glue. I then added a ribbon to the top and placed it above one of our great room windows (the first window you see when you enter the house).
I am very happy with how the wreath turned out. It is not only a wonderful indicator of fall, but it also reminds me of how to not take life or crafting too seriously. Yes, it isn't perfect, but it works very well for me and I am happy I didn't give up on this project. Because, it was a very fun one. Hope you enjoy!
Today I am linking up for Show & Tell on SNAP! with this fall wreath.


Way to go with not giving up. The end product is gorgeous!
ReplyDeleteLove, Oma