Showing posts with label Garden. Show all posts

Friday, May 31, 2013

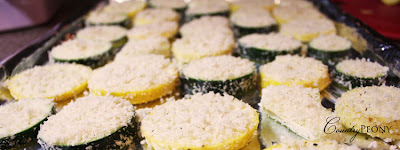
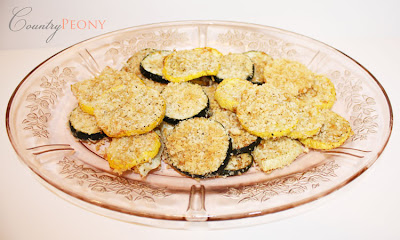
Summer Squash Parmesan Crisps

Thank you for visiting. I now have a new home at www.countrypeony.com. I hope you will find me there.

As soon as the temperatures rise, and the smell of fresh cut of grass is in the air, I am reminded of enjoying fresh, savory vegetables from my parent's wonderful garden. Fresh squash is synonymous with summertime to me.

I recently picked up some wonderful goodies from my husband's grandparents. So, I thought I would put those goodies to use and share this savory and sweet recipe from Food Network that conjures up summertime memories. This recipe is ideal for many situations. It is great as a snack, appetizer for a dinner party, or as a side item. It is also delightful warm or cold. If the sweet smells of fresh and baked parmesan don't get you, then the sweet, yet savory taste of the squash will. So be prepared to enjoy the smells and tastes of this very simple delight.

Summer Squash Parmesan Crisps


Squash Baked Parmesan Crisps

Zucchini and Squash 

Summer Squash and Olive Oil
Olive Oil and Summer Squash mixture.

Fresh Mozzarella

Squash with Panko and Parmesan
Panko, Fresh Parmesan, Salt, and Pepper mixture.

I added aluminum foil to the baking sheet to help with clean up.

Summer Squash Panko Parmesan Crisps

After I took the warm squash out of the oven, I placed them on a cooling rack so that they maintained their consistency and cooled down properly.

Baked Summer Squash Crisps

Baked Zucchini Parmesan Crisps

I hope you have a wonderful weekend. And I hope you get some time to enjoy the summer wherever you may be. 


Thursday, March 21, 2013

Colander Planter


Thank you for visiting. I now have a new home at www.countrypeony.com. I hope you will find me there.

Happy spring! I absolutely love this time of the year. Everything is so vibrant, fresh, and beautiful.
Before the weather gets too hot, my husband and I are taking advantage of this time by grilling and eating outdoors. However, I noticed that our outdoor table is missing something, and that would be color. The March 2013 Real Simple’s magazine article, “New Uses for a Colander,” had a glorious resolution for me: to turn a colander into a planter.
Real Simple
I knew my plan would come to fruition, when I saw that World Market recently added vibrant colors to their stainless steel display. I used the tropical plant that my husband and I bought on our honeymoon in Hawaii. I also added some lovely purple mums for even more color. And voilĂ ! A colander planter was born.

Colander Planter


For this simple DIY project, you will need: a colander (preferably stainless steel), coffee filters, potting soil, fertilizer (optional).
First, you place the coffee filters strategically around the inside of the colander. Then you add the soil and fertilizer. From here you will plant your flowers/plants of choice, and cover with more soil to hide the coffee filters. Lastly, you need to water your plants in place.
coffee filter
Fertilizer

You can also choose to hang the colander by its handles with wire or chains to create a hanging plant option.

succulent garden
The colander planter has made a nice home next to our succulent garden
How are you enjoying what spring has to offer?

Monday, March 11, 2013

How to Crackle Paint

Thank you for visiting. I now have a new home at www.countrypeony.com. I hope you will find me there.

Paint Crackle Effect
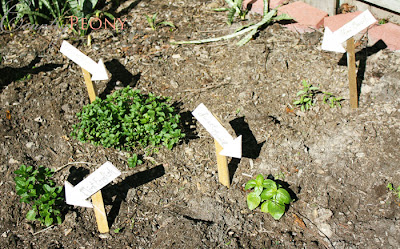
I always loved the sights, smells, and tastes from my mother’s herb garden as I grew up. My husband and I have a small backyard, but I thought I could have a small area designated as a start-up herb garden inspired by my mother’s. So my father came to visit to spread some of his gardening knowledge, and helped me start my herb garden. After everything was planted, I knew I had to add some character to the garden. 

So, my husband and father helped me build some signs. We used a jig saw to cut scrap ply wood and stakes. We then secured the signs with pin nails.

I knew I wanted to add a distressed look to the signs. I thought the crackle effect would be perfect, and it would wear really well outside.

To get the crackle effect I used: base color (Sherwin-Williams exterior impatiens petal), Behr Premium Plus Crackle paint, flat paint (Rust-oleum Painter’s Touch exterior white flat paint), and a paintbrush.
The process to achieve the crackle look is very simple. You paint the base coat and wait until it is dry. Then you paint the Crackle coat and wait until it is dry (it will take about an hour to dry). Finally, you paint the top coat and watch as it transforms over the period of half an hour. I told you the process was extremely simple. J
Crackle effect 

From here I used Sharpie gold and silver oil-based paint markers to add the names to the signs.
Basil

Basil

Rosemary

Tomato
I know that this is not an herb. But I love tomatoes, and they grow so well in Texas.

Garden Sign
And how could we not plant an orange pepper?

Have you ever applied the crackle effect?


Update: April 21, 2013

Warning: If  your dog is trained to retrieve, you may not want to place the signs around him/her. If your dog does fill the need to retrieve the signs, you may need to start back at step one, and find a better placement for your signs :).

Today, I walked out to find my signs retrieved and damaged next to the door. Then, I found Nessie feeling very guilty :).

damaged crackled signs


Related Posts Plugin for WordPress, Blogger...